Introduction
The documentation will explain the extent of DigitalPUSH's services and their usage. Please read this document thoroughly for a better understanding of how to use DigitalPUSH and how to make the most of our services.Basics
What are web push notifications?Web push notifications are notifications that can be sent to a user via desktop web and mobile web. These are alert style messages that slide in at the top or bottom right hand corner of a desktop screen, depending on the operating system, or appear on a mobile device in a manner nearly identical to push notifications delivered from apps. Web push notifications are delivered on a user's desktop or mobile screen anytime they have their browser open - regardless of whether or not the user is on the website.
Who can use web push notifications?
Basically anyone that has a website.
Browser support
All major browsers support Web Push. Android devices may also receive Web Push notifications, in addition to notifications from apps.| Browser | Windows PC | macOS | Android | iPhone(iOS) |
|---|---|---|---|---|
| Chrome | YES | YES | YES | NO |
| Firefox | YES | YES | YES | NO |
| Safari | NO | YES | N/A | NO |
| Microsoft Edge | YES | N/A | YES | N/A |
| Opera | YES | YES | YES | NO |
| Yandex | YES | YES | YES | N/A |
| Samsung Internet Browser | N/A | N/A | YES(4.0+) | N/A |
| UC Browser | NO | N/A | NO | NO |
| Internet Explorer | NO | N/A | N/A | N/A |
Service usage
DigitalPUSH and it's platform ( digitalpush.org ) offers a completely free of charge web push notification service. DigitalPUSH imposes no restrictions, charges, usage limitations or serving costs to it's users.
DigitalPUSH, unlike other similar "free" services, does not restrict a maximum number of push subscribers before the webmaster is forced to pay. No, everything is... well, free.
Registration
The registration process is pretty self explanatory. You go to the registration page, you complete the form, and you're done. We do not impose any approval or verification for someone to start using our services.
Your account
Once you've completed the registration process you will be taken to your service selection panel where you can choose whether you want to use DigitalPUSH simply as a push notifications service or if you intend to benefit from our advertising and monetization features.

Adding a website
To add a new website to your DigitalPUSH account, while logged into your DigitalPUSH account, under the "Websites" section in the navigation, click the "New website" link.
Complete the form in the page with the required information as it follows:
- Domain name
Enter the domain of your website only! Nohttp://orhttps://orwww.
If you want to add DigitalPUSH on a subdomain you will have to add that subdomain separately.
Wildcard subdomains are not accepted. - Website category
Select the category that suits your website best. - The plan for your website
Select the plan that best suits your needs:- Free plan - Full access to all DigitalPUSH features. The service costs are sustained by delivering promotional push notifications to your subscribers as specified in our terms of service.
- Paid plan - Full access to all DigitalPUSH features. The cost for the paid plan is $0.49 USD per 1000 active subscribers per moenth. The billing is done in the first day of each month.
- Monetized property - Full access to all DigitalPUSH features. The owner of a monetized property can choose to send between 1 and 4 promotional push notifications per subscriber per day. 85% of the income generated remains with the owner of the monetized property.
Press the "Add my website" button and you're all set. Once again there is no waiting time or approval required.

Integration
To integrate DigitalPUSH's services within your website, web application or project you will need to fetch the implementation code for your website. For that, while logged into your DigitalPUSH account, under the "Websites" section in the navigation, click the "Get code" link. You can also access this page from the "Websites" page by pressing the "Get code" button specific for the website you are trying to implement our services for.
There are a few ways to integrate DigitalPUSH with your website, such as:
- Manual integration - the manual integration will generate a code for you to copy / paste into your website's HTML code.
- Direct link - you can create an unique link that you can distribute to collect subscribers
- WordPress plugin - a plugin for your WordPress website that will automatically install the code that would normally be generated by the "Manual integration"
- Content locker - use the "Content locker" to allow visitors to view the page only after subscription

1. Manual integration - Options list:
- Website Connection - Select the type of connection you are implementing for. Can be http:// or https://

- The regular http:// connection will display a double opt-in message by default and the subscription process will take place in a new window hosted by DigitalPUSH. This system is necessary because push notifications only work with secure connections.
- The encrypted https:// connection requires you to install our Service Worker SDK file to your server. The SDK file can be downloaded by clicking the button with the same name. To learn how to upload the service worker to your website try reading this article: https://www.wikihow.com/Upload-Files-to-an-FTP-Server

Tip! Installing the SDK file also allows you to disable the double opt-in system so that the permission request is directly from the browser.
- Double opt-in delay - The time in seconds the code should wait before displaying the double opt-in message.

- Double opt-in style - allows you to select the style of the double opt-in message.

- Double opt-in theme - allows you to select the color scheme of your double opt-in message.

- Double opt-in title - allows you to enter the title of your double opt-in message. Applicable for the "Overlay" style.

- Double opt-in message - allows you to enter your double opt-in message. Applicable for the "Overlay" and "Flying box" styles.

- Double opt-in allow button text - allows you to enter the text that will be displayed on the button that allows the subscription. Applicable for the "Overlay" or "Flying box" styles.

- Double opt-in reject button text - allows you to enter the text that will be displayed on the button that denies the subscription. Applicable for "Overlay" or "Flying box" styles.

- Double opt-in logo URL - allows you to enter the URL of the logo which will be displayed within the double opt-in message. If left blank a bell icon will be shown. Applicable for "Overlay" or "Flying box" styles.

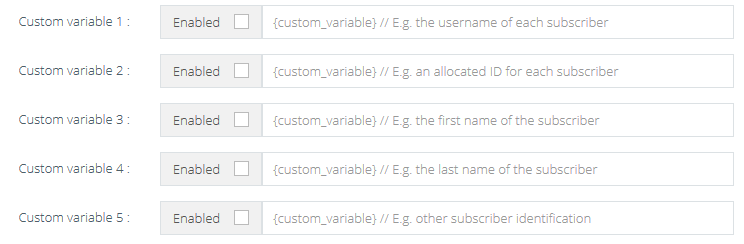
- Custom variable 1..5 - allow you to set custom variables for each subscriber.
Note! - If you have a https:// website and you don't want to upload the service worker or you want to display a pre-message before subscription, simply generate the code for the http:// connection.
2. Direct link - Options list:
- Style - allows you to select the style of your direct link landing page

- Message - allows you to enter the message that will be displayed within the landing page. Applicable only for the "Default style".

- Redirect on allow - allows you to enter the URL where the visitor will be redirected after subscription

- Redirect on denial - allows you to enter the URL where the visitor will be redirected if the subscription was denied or if the browser does not support push notifications.

- Background image - allows you to change the background image for the "Default" style. Applicable only for the "Default style".

- Custom variable 1..5 - allow you to set custom variables for each subscriber.
3. WordPress integration - Options list:
- Code key - unique website key which needs to be entered within the plugin settings.

- API key - Bulk API key which needs to be entered within the plugin settings to enable the automated notifications on each published post.

4. Content locker - Options list:
- Locker title - allows you to enter the title that will be displayed within the content locker.

- Locker message - allows you to enter the message that will be displayed within the content locker.

- Redirect on allow - allows you to enter the URL where the visitor will be redirected after subscription. Set to "No" to disable the redirect entirely.

- Redirect on denial - allows you to enter the URL where the visitor will be redirected if the subscription was denied or if the browser does not support push notifications. Set to "No" to disable the redirect entirely.

Note! - the content locker only works for https:// websites and requires the service worker to be installed.
Custom parameters
DigitalPUSH offers 5 custom variables that can be passed for each subscription.
To make use of these, enable each of the custom variables while preparing your implementation code.
These custom parameters will be saved for each individual subscriber and can be used to automatically personalize each push notification you send.
To better demonstrate the use of this feature let's assume a scenario:
You are developing a chat application and you want to notify each offline member when he received a new message.
For that you can use the custom parameters to personalize each notification sent and in your implementation code you have assigned the DGPcustom1 variable to save the username of your user and the DGPcustom2 to save his first name.
Your implementation code is looking something like this:
              			<!-- Begin DigitalPUSH code -->

						<script>

						var DGPkey =
						"generated_unique_key";
						//mandatory

						var DGPdelay = "0";

						var DGPmessage = "Enable notifications be informed when you receive a message on myawesomechatapp.com";

						var DGPcustom1 = "<?php echo $username; ?>";

						var DGPcustom2 = "<?php echo $user_first_name; ?>";

						</script>

						<script type="text/javascript" src="//cdn.digitalpush.org/lib.js"></script>

						<!-- End DigitalPUSH code -->
Each of the subscribed users will have their usernames and first names storred, and when you will send them a message you will be able to use {custom1} which will be replaced with their username and {custom2} which will be replaced with their first name.
These custom parameters can be used in both the title and the body of a web push. In our example if the web push title is "Hey {custom2}", the {custom2} parameter will be replaced with the first name of the subscriber. If the subscriber's first name is John, the title "Hey {custom2}" will be received as "Hey John".
Callback on subscription
DigitalPUSH allows members to set a callback URL for every subscription.
The parameters returned for every subscription are:
- {pid} - Your publisher ID with DigitalPUSH
- {wid} - Your website ID with DigitalPUSH
- {sid} - Subscriber ID with DigitalPUSH
- {country} - Subscriber country
- {browser} - Subscriber browser
- {os} - Subscriber operating system
- {lang} - Subscriber language
- {custom1} - Subscriber's assigned custom variable 1
- {custom2} - Subscriber's assigned custom variable 2
- {custom3} - Subscriber's assigned custom variable 3
- {custom4} - Subscriber's assigned custom variable 4
- {custom5} - Subscriber's assigned custom variable 5
- {cps} - Reward per subscription. ( Will be 0 if the monetization feature is disabled )
An example of a callback URL would be:
https://myexamplewebsite.com/myPostBack.php?publisherID={pid}&websiteID={wid}&subscriberID={sid}&country={country}&browser={browser}&os={os}&language={lang}&var1={custom1}&var2={custom2}&var3={custom3}&var4={custom4}&var5={custom5}&earned={cps}
To add your callback URL, while logged into your DigitalPUSH account, go to Websites → My websites → Options → Edit callback URL.
Settings for websites
To edit your website's settings, within the main navigation, hover the "Websites" section then click on the "My websites" link.
The available options are listed for each individual website within their respective widget.
- Get code - Will redirect you to the code implementation page and will automatically select the current website.
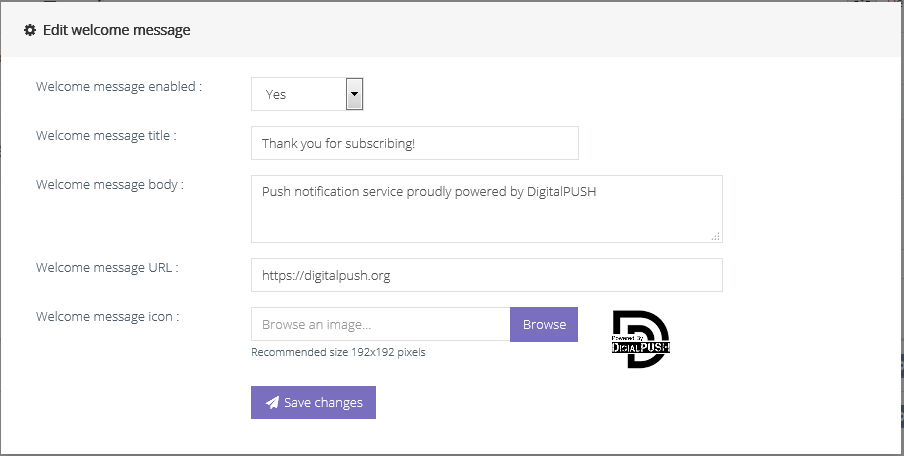
- Welcome message - Allows you to edit the welcome message and / or disable it. The welcome message is enabled by default.
- Callback URL - Allows you to add / edit a callback URL that will be notified on each new subscription. For details please see Callback on subscription
- Clean unsubscriptions - Will check and delete any users that are no longer subscribed.
Sending push notifications
To send push notifications to your subscribers, while logged into your DigitalPUSH account, under the "Push messages" section in the navigation, click the "New message" link.
As a DigitalPUSH member you can send 3 types of messages:
- SEND TO ALL - You will send a web push to all the subscribers of a website you own
- SEGMENTED - You can target specific countries, browsers and operating systems from the subscriber base of a website
- SINGLE - Send to a specified subscriber ID
After selecting the type of push message you wish to send you need complete the form before deploying your new web push.
We will be explaining the fields and what they stand for as it follows:
- Website
The website / property you are sending the web push for. - Load from template
This option allows you to load the notification title, message, URL and icon from a previously saved template.
To manage your saved templates, go to your "Sent messages" and expand the messages that were saved as a template to remove them or add new ones. - Notification title
Required. The title of your web push. Maximum 64 characters allowed.
The notification title allows the usage of {custom1} {custom2} {custom3} {custom4} {custom5} which will be replaced with the saved data from each subscriber as explained in the Custom parameters section. - Notification message

Required. The body or content of your web push. Maximum 512 characters allowed.
The notification message allows the usage of {custom1} {custom2} {custom3} {custom4} {custom5} which will be replaced with the saved data from each subscriber as explained in the Custom parameters section.
Note. Different browsers will display different length of the notification body. - Notification URL
Optional. The URL to which the subscriber will be redirected if he clicks the notification.
Must include the http:// or https:// part. - Notification icon
Optional. The icon of your web push.
The notification icon has 3 selectable options :- No icon you will send a web push with no icon
- Used previously use a notification icon from a previously sent web push
- Upload an icon upload a new icon for this web push
- Delivery
This option allows you to select when will your campaign be delivered, and in here you have two other options :- Send immediately - The message will be delivered within the next 15 seconds.
- Scheduled delivery - You can schedule your message to be delivered at a time of your choice.
- You can select whether you want to resend your message daily or weekly
- You can select how many times you want your message to be resent
- Time to live
( seconds ) This option specifies how long will it take before the notification expires if the device is offline. The default is 259,200 ( 3 days ). - Subscriber ID *
Enter the ID of the subscriber you wish to send the web push to. This ID can be fetched from the "Subscribers" section
* Note This option is only available for the messages that have the type SINGLE, and is mandatory for this type of message. - Countries *
Select whether you want to filter the subscribers receiving this message by country- Worldwide - Subscribers will not be filtered by country
- Geotargeted - Subscribers will be filtered by country.
Two new select boxes will appear, the select box in the right contains the countries that are allowed to receive the web push.
* Note This option is only available for the messages that have the type SEGMENTED. - Browsers
Select whether you want to filter the subscribers that the web push is being sent to based on browsers.- All browsers - Subscribers will not be filtered by browser
- Selected browsers - Subscribers will be filtered by browser.
A new multi-select box will appear and you can select which browsers you want to send to.
* Note This option is only available for the messages that have the type SEGMENTED. - Operating systems
Select whether you want to filter the subscribers that the web push is being sent to based on operating systems.- All operating systems - Subscribers will not be filtered by operating system
- Selected operating systems - Subscribers will be filtered by operating system.
A new multi-select box will appear and you can select which operating systems you want to send to.
* Note This option is only available for the messages that have the type SEGMENTED. - Languages
Select whether you want to filter the subscribers that the web push is being sent to based on language.- Older than + # of days - the notifications will only be sent to subscribers that are registered for more than the indicated number of days.
- Newer than + # of days - the notifications will only be sent to subscribers that were registered after the indicated number of days.
* Note This option is only available for the messages that have the type SEGMENTED. - Subscription age
Select whether you want to filter the subscribers that the web push is being sent to based on their subscription date.- All languages - Subscribers will not be filtered by language
- Selected languages - Subscribers will be filtered by language.
A new multi-select box will appear and you can select which languages you want to include.
* Note This option is only available for the messages that have the type SEGMENTED. - Custom variable 1 ... to 5
Select whether you want to filter the subscribers that the web push is being sent to based on your own custom variables.- Ignored - Subscribers will not be filtered by your custom variables
- Selected values - Subscribers will be filtered by your custom variables.
A new multi-select box will appear and you can select which variables you want to include.
* Note This option is only available for the messages that have the type SEGMENTED.
Information after being deployed all messages are stored in our database and sent automatically by a cron job that runs every second. We are mentioning this for our users to fully understand how the system works and why messages receive the "Pending" status after being deployed, as well as the small delay between the deployment of the message and the time being sent.
Monetization
Aside from our main service of allowing members to use web push notifications on their websites, DigitalPUSH enables it's users to monetize their subscribers.
The monetization process is pretty straightforward and 100% passive. Basically, all you need to do to enable the monetization feature for one of your websites is to add it as a monetized property. You will still get full access to all of our push notification features and as a bonus you will actually get paid for using our service.
Application
To apply for the monetization feature for one of your websites select the "Monetized" plan when adding your website.
Usage
Enabling the monetization feature for one of your websites means that you give DigitalPUSH the permission to send advertisements to the subscribers of that particular property.
Our system limits the number of advertisements shown per day per each subscriber to a maximum of 4.
DigitalPUSH shares up to 85% of the bid for a click / conversion / thousand views with the member.
In some cases we will deny the monetization of websites that fit in certain categories mentioned within our Content policy
You can check your account balance under the "Financial" section or in your account dashboard.
Withdraws
Withdrawing your revenue with DigitalPUSH is as simple as it gets:
- While logged into your DigitalPUSH account, in the navigation menu, go to the "Financial" section, and click the "Withdraw funds" link.
- Complete the form and click the "Submit my withdraw" button and you are done.
The minimum withdraw amount via PayPal is $1.00 USD and $500.00 USD via wire transfer. Withdraw requests can be sent anytime. A withdraw request is usually processed within a couple of hours, however, in some cases ( weekends, national holidays ), it may take up to 48 hours to process a withdraw request.
To request a wire transfer withdraw please contact us.
Advertising
DigitalPUSH is not an ad network. DigitalPUSH is a service for the website owners. Not being a traffic hungry service that revolves solely around demand and supply enables our platform to provide the best possible traffic for any advertiser's campaigns.
Buying web push traffic directly from website owners and pin-point the traffic you buy will yield the highest R.O.I for any advertiser, regardless of the product, offer or campaign they are promoting.
Last but not least, the web push notifications are a new ad format that converts better than anything marketing has seen so far. Why? Because the traffic can't really be faked or generated. The clicks a campaign gets will always interest based.
Requirements
All campaigns submitted for approval must abide to our Content policy. In order to protect the subscribers of our members and due the high demand for ad format we tend to be very picky when it comes to approving campaigns.
DigitalPUSH does not limit the number of campaigns you can have. The only limitation we impose is a minimum of $0.10 USD per thousand views for CPM campaigns or $0.10 USD per click for CPC campaigns.
Note : We encourage advertisers to submit their campaigns for approval before actually depositing funds to their account.
Campaigns
On top of the features and segmentations that are similar to sending a web push ( see Sending push notifications ), advertisers get a few additional options to improve their targeting capabilities even further, such as:
- Category targeting
which will allow advertisers to target interest based traffic - Website targeting
which enables advertisers to select exactly on which website(s) their campaign would appear - Website blocking
which allows advertisers to stop displaying their campaign to underperforming websites if any - Country blocking
which enables advertisers to target world-wide traffic minus countries they do not consider fit for their campaign
After submitting a campaign for approval please allow us between 2 and 48 hours to verify and approve it.
Notes
- Once approved the campaign content can not be changed. By content we refer to the notification title, body, icon and landing page URL.
- The audience targeting options can be modified on approved campaigns at any given time without altering the position of the campaign or it's bid.
- Approved campaigns will be deleted if they receive no traffic for more than 30 days.
Funding and deposits
Funding your account can be done automatically via PayPal. While logged into your DigitalPUSH account, in the main navigation, go to the "Financial" section and press the "Deposit funds" link. If you wish to deposit funds to your account via Wire Transfer or other payment methods please contact us.
The minimum amount you can deposit via PayPal is $10.00 USD
Your advertising campaigns will be live for as long as your account has funds. Approved campaigns with DigitalPUSH do not need to be funded separately.
Push API
DigitalPUSH offers an API interface that is used to integrate DigitalPUSH's distribution service capabilities with client's personal projects.
The push API is designed for developers and accompanied by a detailed documentation in the sections below.
Description
The DigitalPUSH Push API allows the DigitalPUSH members to integrate the web push service within their projects or web applications and distribute web push notifications to their subscriber base directly from their project or web application.
The push API is split in two sections, one for sending targeted single web pushes and the other for bulk sending.
API endpoint
All references to API requests in this document point to the root URL:
https://api.digitalpush.org/push/
Single notification API
To send a single notification through this API you will need to use an API key that has the "Single notification" type selected.
To generate a key for your website please follow these steps:
- Log into your DigitalPUSH account
- In the main navigation go to API
- Select the "Generate a new key" link
- Select the "API key website" to match the website you are generating the key for
- Select the "Single notification" as the "API key type"
- Press the "Generate my new key" button.
The single notification API accepts only POST requests. Cross-domain requests are not handled. The single notification API usage is limited to 1 request per second.
The API requires two headers to be passed through:
- Content-Type - will be set as application/json
- Authorization - will contain the generated key
Required request parameters :
| Parameter | Accepted values | Information |
|---|---|---|
| subscriber_filter | "id", "ip", "custom1", "custom2", "custom3", "custom4", "custom5" | The filter by which the subscriber will be found |
| subscriber_value | VARCHAR(64) | The search value for the subscriber filter |
| message_title | VARCHAR(64) | The title of the web push notification |
| message_body | VARCHAR(512) | The body ( content ) of the web push notification |
| Parameter | Accepted values | Information |
|---|---|---|
| message_time_to_live | INT(6) | How long will it take before the notification expires if the device is offline ( in seconds ). The default is 259,200 ( 3 days ). |
| message_click_url | VARCHAR(128) | The click URL of the web push |
| message_icon | VARCHAR(128) | The URL of the web push icon. https:// only images are accepted. |
Example POST request :
REST
POST https://api.digitalpush.org/push/ HTTP/1.1

Content-Type: application/json
Authorization: <key_goes_here>

{
	"subscriber_filter": "ip",
	"subscriber_value": "123.123.123.123",
	"message_title": "My web push title",
	"message_body": "The body of my web push notification",
	"message_click_url": "https://google.com",
	"message_icon": "https://www.google.com/images/branding/googlelogo/1x/googlelogo_color_272x92dp.png"
}
cURL
curl -X POST -H "Authorization: <key_goes_here>" -H "Content-Type: application/json" -d '{
	"subscriber_filter": "ip",
	"subscriber_value": "123.123.123.123",
	"message_title": "My web push title",
	"message_body": "The body of my web push notification",
	"message_click_url": "https://google.com",
	"message_icon": "https://www.google.com/images/branding/googlelogo/1x/googlelogo_color_272x92dp.png"
}' https://api.digitalpush.org/push/
Bulk sending API
To send a multiple notifications to the subscriber base of one of your websites, you will need to use an API key that has the "Bulk sending" type selected.
To generate a key for your website please follow these steps:
- Log into your DigitalPUSH account
- In the main navigation go to API
- Select the "Generate a new key" link
- Select the "API key website" to match the website you are generating the key for
- Select the "Bulk sending" as the "API key type"
- Press the "Generate my new key" button.
The bulk sending API accepts only POST requests. Cross-domain requests are not handled. The bulk sending API usage is limited to 1 request per minute.
The API requires two headers to be passed through:
- Content-Type - will be set as application/json
- Authorization - will contain the generated key
Required request parameters :
| Parameter | Accepted values | Information |
|---|---|---|
| message_title | VARCHAR(64) | The title of the web push notification |
| message_body | VARCHAR(512) | The body ( content ) of the web push notification |
| Parameter | Accepted values | Information |
|---|---|---|
| message_time_to_live | INT(6) | How long will it take before the notification expires if the device is offline ( in seconds ). The default is 259,200 ( 3 days ). |
| message_click_url | VARCHAR(128) | The click URL of the web push |
| message_icon | VARCHAR(128) | The URL of the web push icon. https:// only images are accepted. |
| segment_country | VARCHAR(512) | Country short code ( 2 letters ). Separated by ( ; ) |
| segment_browser | VARCHAR(64) | Browser ID based on the list below. Separated by ( ; ) 1 - Internet Explorer 2 - Mozilla Firefox 3 - Safari 4 - Google Chrome 5 - Opera 6 - Netscape 7 - Maxthon 8 - Konqueror 9 - Other |
| segment_os | VARCHAR(64) | Operating system ID based on the list below. Separated by ( ; ) 1 - Windows 2 - Mac OS 3 - Linux 4 - Ubuntu 5 - iOS 6 - Android 7 - BlackBerry OS 8 - Other Mobile OS 9 - Other |
| segment_language | VARCHAR(512) | Language short code ( 2 letters ). Separated by ( ; ) |
| segment_age | INT(5) | Positive values stand for a subscription age newer than the given value in days. Negative values stand for a subscription age older than the given value in days. |
| segment_custom1 | VARCHAR(1024) | Segmentation by self registered custom variable. Separated by ( ; ) |
| segment_custom2 | VARCHAR(1024) | Segmentation by self registered custom variable. Separated by ( ; ) |
| segment_custom3 | VARCHAR(1024) | Segmentation by self registered custom variable. Separated by ( ; ) |
| segment_custom4 | VARCHAR(1024) | Segmentation by self registered custom variable. Separated by ( ; ) |
| segment_custom5 | VARCHAR(1024) | Segmentation by self registered custom variable. Separated by ( ; ) |
Example POST request :
REST
POST https://api.digitalpush.org/push/ HTTP/1.1

Content-Type: application/json
Authorization: <key_goes_here>

{
	"message_title": "My web push title",
	"message_body": "The body of my web push notification",
	"message_click_url": "https://google.com",
	"message_icon": "https://www.google.com/images/branding/googlelogo/1x/googlelogo_color_272x92dp.png",
	"segment_country": "US;CA;AU",
	"segment_browser": "2;4;5",
	"segment_os": "1;2;6",
	"segment_language": "en;fr;es",
	"segment_age": "3",
	"segment_custom1": "John;Mary;Jane",
	"segment_custom2": "Doe;Smith;Cena",
	"segment_custom3": "johndoe@gmail.com;marysmith@gmail.com;janecena@yahoo.com",
	"segment_custom4": "Winter;Spring;Summer",
	"segment_custom5": "2002;1987;1991"
}
cURL
curl -X POST -H "Authorization: <key_goes_here>" -H "Content-Type: application/json" -d '{
	"message_title": "My web push title",
	"message_body": "The body of my web push notification",
	"message_click_url": "https://google.com",
	"message_icon": "https://www.google.com/images/branding/googlelogo/1x/googlelogo_color_272x92dp.png",
	"segment_country": "US;CA;AU",
	"segment_browser": "2;4;5",
	"segment_os": "1;2;6",
	"segment_language": "en;fr;es",
	"segment_age": "3",
	"segment_custom1": "John;Mary;Jane",
	"segment_custom2": "Doe;Smith;Cena",
	"segment_custom3": "johndoe@gmail.com;marysmith@gmail.com;janecena@yahoo.com",
	"segment_custom4": "Winter;Spring;Summer",
	"segment_custom5": "2002;1987;1991"
}' https://api.digitalpush.org/push/